How To Apply Makeup Step By Step For Beginner On This Eid

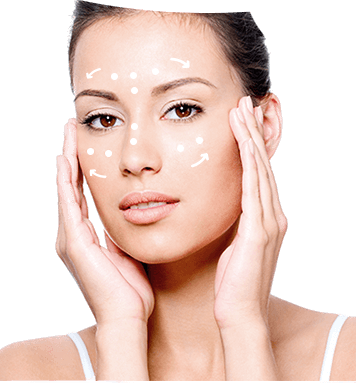
Step 1: Moisturize or apply a primer.
You want to start out off with a basic primer. This lessens the looks of makeup and fine lines. Apply a layer of primer to your face victimization your fingers. make certain to particularly target your nose, beneath your eyes, your forehead, and your cheekbones.
Step 2: Fill in brows.
Eyebrows could look lighter in pictures, thus it is a smart plan to fill in your eyebrows before a photoshoot. you will need a brow powder that's 1-2 shades lighter than your brow color.
Take the brow brush and begin at rock bottom of the brow. Work upward, creating short and direct strokes with the comb.
Fill in gaps in hair to create your eyebrows look fuller and additional pronounced. Keep going till you reach the highest fringe of your supercilium.

Step 3: Apply foundation.
Use a matte foundation. once applying foundation for pictures, you would like to use a matte foundation. Matte makeup doesn't mirror light-weight, creating it a much better alternative for photography.To start out, use your fingertips to dab some foundation on your cheeks, your chin, the bridge of your nose, and your forehead.
Use a makeup brush to mix the makeup into your face. Use large, circular motions as you progress the comb throughout your face.
Go over your face with the makeup brush many times to create positive the muse appearance amalgamated and sleek. confirm to mix the muse into your neck likewise, thus there's not a pointy distinction between your face and neck. ne'er stop mixing foundation at your jawline.
Apply foundation additional meagrely if you are photographing outside. If you are doing an out of doors shoot, you are doing not want the maximum amount foundation. Natural light-weight will build makeup seem additional obvious and you'll look overdone with an excessive amount of foundation. solely apply foundation to areas wherever your skin is uneven and stained if you will be shooting outdoors.

Step 4: Cover dark spots with concealer.
Use concealer underneath your eyes, on your forehead, chin, and therefore the bridge of your nose. Once your basic foundation is arranged down, you will need to use some concealer. this could facilitate eliminate the looks of dark circles underneath your eyes, and might additionally highlight bound areas to form a slimming have an effect on on your face.
Use the comb that came along with your concealer. Dab some concealer underneath your eyes. Draw a line of concealer running down the bridge of your nose. Then, add some to your chin and forehead. it should even be an honest plan to feature some concealer simply higher than you lip.
Use a makeup sponge to slowly dab the concealer into your face. Go slowly and keep dabbing till the concealer is mixed into the remainder of your makeup.
Try applying a lighter, powder-based foundation below your eyes, on your chin, and on the middle of your forehead. Then, use a fluffy brush to mix it outward.

Step 5: Add eyeshadow.
Add highlighter to your lids as a base. you would like your eyes to appear bright and outlined in photos. Adding highlighter to your eyelids will facilitate stop them from trying sunken in. select a shade of lightness eye shadow that matches your natural skin tone. Use an outsized war paintbrush to use it to each your eyelids. Use sideways, back and forth motions to hide a whole lot of your lid, likewise as your brow bone.
Avoid sparkly or bright eye shadows. like foundation, one thing sparkly or bright will not look nice on camera. continue solid shades. Matte eye shadow works best here
Apply a shade slightly darker than your skin tone to your crease. you would like your eyes to appear outlined. to form this impact, you will need to use a shade of eye shadow slightly darker than your skin to stimulate your eye. you'll use AN angulate brush or a tiny low eye shadow brush to use this shade to your crease and therefore the corner of your eye.
Use a corner brush to stipulate the outer corner of your eye. Then, run the corner brush on your crease.
Take a fluffy brush and sweep it across your full palpebra in tiny circular motions. this can mix your corner and crease makeup with the remainder of your eye.
Use a fair darker shade for your lower lash line. so as to create your eyes look printed and outlined, take a darker shade of eye shadow. Apply a number of this shade to your corner brush. Draw a tiny low line simply beneath your lower lash line with this shade.
Apply an equivalent highlighter you used on your cheeks to the inner corners of your eyes. Once you've got finished the most a part of your eyes, you will need to spotlight your inner corners. this could stop your eyes from trying sunken into your face. you {will need} to use an equivalent highlighter you applied to your cheeks earlier because it will match the remainder of your face.
Use your fingers to dab some highlighter into the inner corners of your eyes.
Take a buildup brush and make swiping motions round the corners of your eyes. this could mix your makeup out.

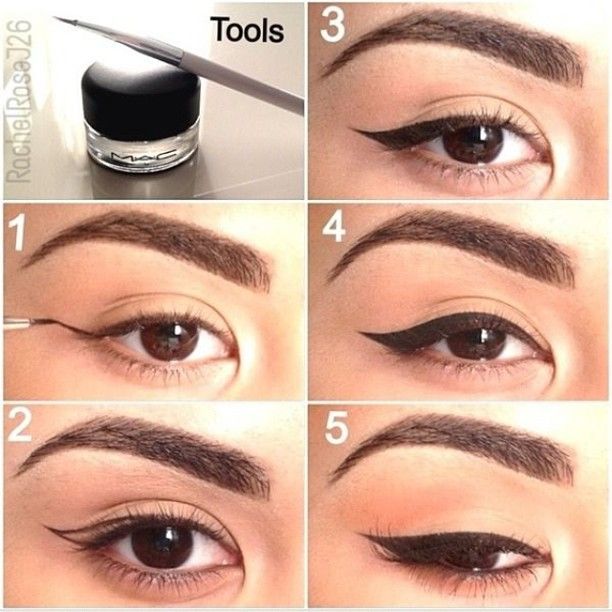
Step 6: Finish off the eye look with liner.
Eyeliner is very important in pictures. It outlines your eyes in order that they look crisp and noticeable. you'll be able to use a thin brush, like a corner brush, to draw a line simply higher than your lash line. Keep the comb terribly near to your lashes as you draw a skinny line all across your lash line.
Black eyeliner is commonly counseled over brown shades. Black tends to indicate up higher on camera.
Step 7: Add blush to the apples of cheeks.
Use a brighter shade of blush than traditional. If you do not need to use bronzer, attempt applying blush instead. Makeup sometimes pictures regarding 2 shades lighter than it really is. Therefore, it is a smart plan to decide on a rather brighter shade of blush to create your cheeks look red and healthy.decide a bright pink shade of blush and use a fluffy brush to use to your cheeks.
Start dabbing on blush on the apples of your checks. As you dab, move the comb backward and up slightly.
After dabbing, use circular motions to mix your blush in an exceedingly sleek, circular line.

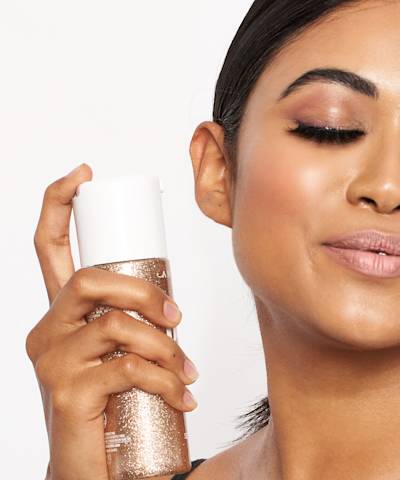
Step 8: Apply highlighter.
Dab some highlighter over your concealer. For photos, highlighter will facilitate build your face light a touch additional. It can even facilitate set your makeup and keep it from weakening throughout a photograph shoot. employing a giant and downlike makeup brush, dab a tiny low quantity of highlighter on the areas wherever you applied concealer.
Highlighter is best used for pictures taken within the evening or in low-light conditions.

Step 9: Apply contour.
Contour. even though you do not sometimes contour, doing this for a photoshoot will facilitate your face look slimmer and additional outline. Use a dark stick foundation to trace your face and mix the makeup from there.
Run the muse from your temples to your hairline. realize your bone by putting your finger on your face and finding the hollow half. Place a line of foundation here. you ought to additionally place 2 lines of foundation running on either aspect of the bridge of your nose. Trace your jawline with foundation, and so add a dab to your chin. Use a sponge to dab the makeup into your face.

Step 10: Swipe on a statement lip.
Pick a lipstick shade you prefer. once it involves lipstick, brighter tends to indicate up higher in the footage. However, it is best to choose a shade you prefer. you would like to feel daring and cozy in photos and a lipstick shade you like will facilitate bolster feelings of confidence.
Line the lips initial with a lip liner that's one shade darker than your lipstick to create the lipstick keep longer.
Apply the lipstick with a tiny low lip brush to create the lipstick additional precise and sharp.
As with different kinds of makeup, matte lipsticks work best here.
Place the tip of the lipstick on your lips. Slowly trace the form of your lips with the lipstick.
Make sure to feature lip gloss. you are doing not need to neglect lip gloss once putting on makeup for photos. Lip gloss will facilitate your lips to look full and get footage. like the lipstick, trace the form of your lips with a complementary gloss.
Alternately, if you do not need to use lip gloss, get a lipstick with a textile or shiny end.

Step 11: Set your entire face with setting powder or spray—or both.
Finish off with a setting spray. If you are taking tons of images, your makeup could fade throughout the shoot. it is a smart plan to end off your makeup by adding a pleasant setting spray. Hold the spray a few feet aloof from your face, shut your eyes, and mist your face in the spray. this can keep your makeup intact.

Step 12: Finally, put on mascara.
Add make-up. Once you are finished along with your war paint, add make-up. To start, take an eye fixed lash crimper. Clamp it down on the bottom of your eyelashes to allow them a small arch. this can build them show up higher in photos. Then, take a tube of make-up and apply it to your eyelashes.
Clamp your eyelashes a second time if you would like additional of a curl. Heating the crimper slightly with a blow dryer can even facilitate the curl set.
Use slow, somewhat wiggly strokes to elongate your lashes and separate them.
If any of your lashes clump, you'll be able to flip the comb on its aspect. try and separate the lashes with the tip of your make-up brush.


Comments
Post a Comment